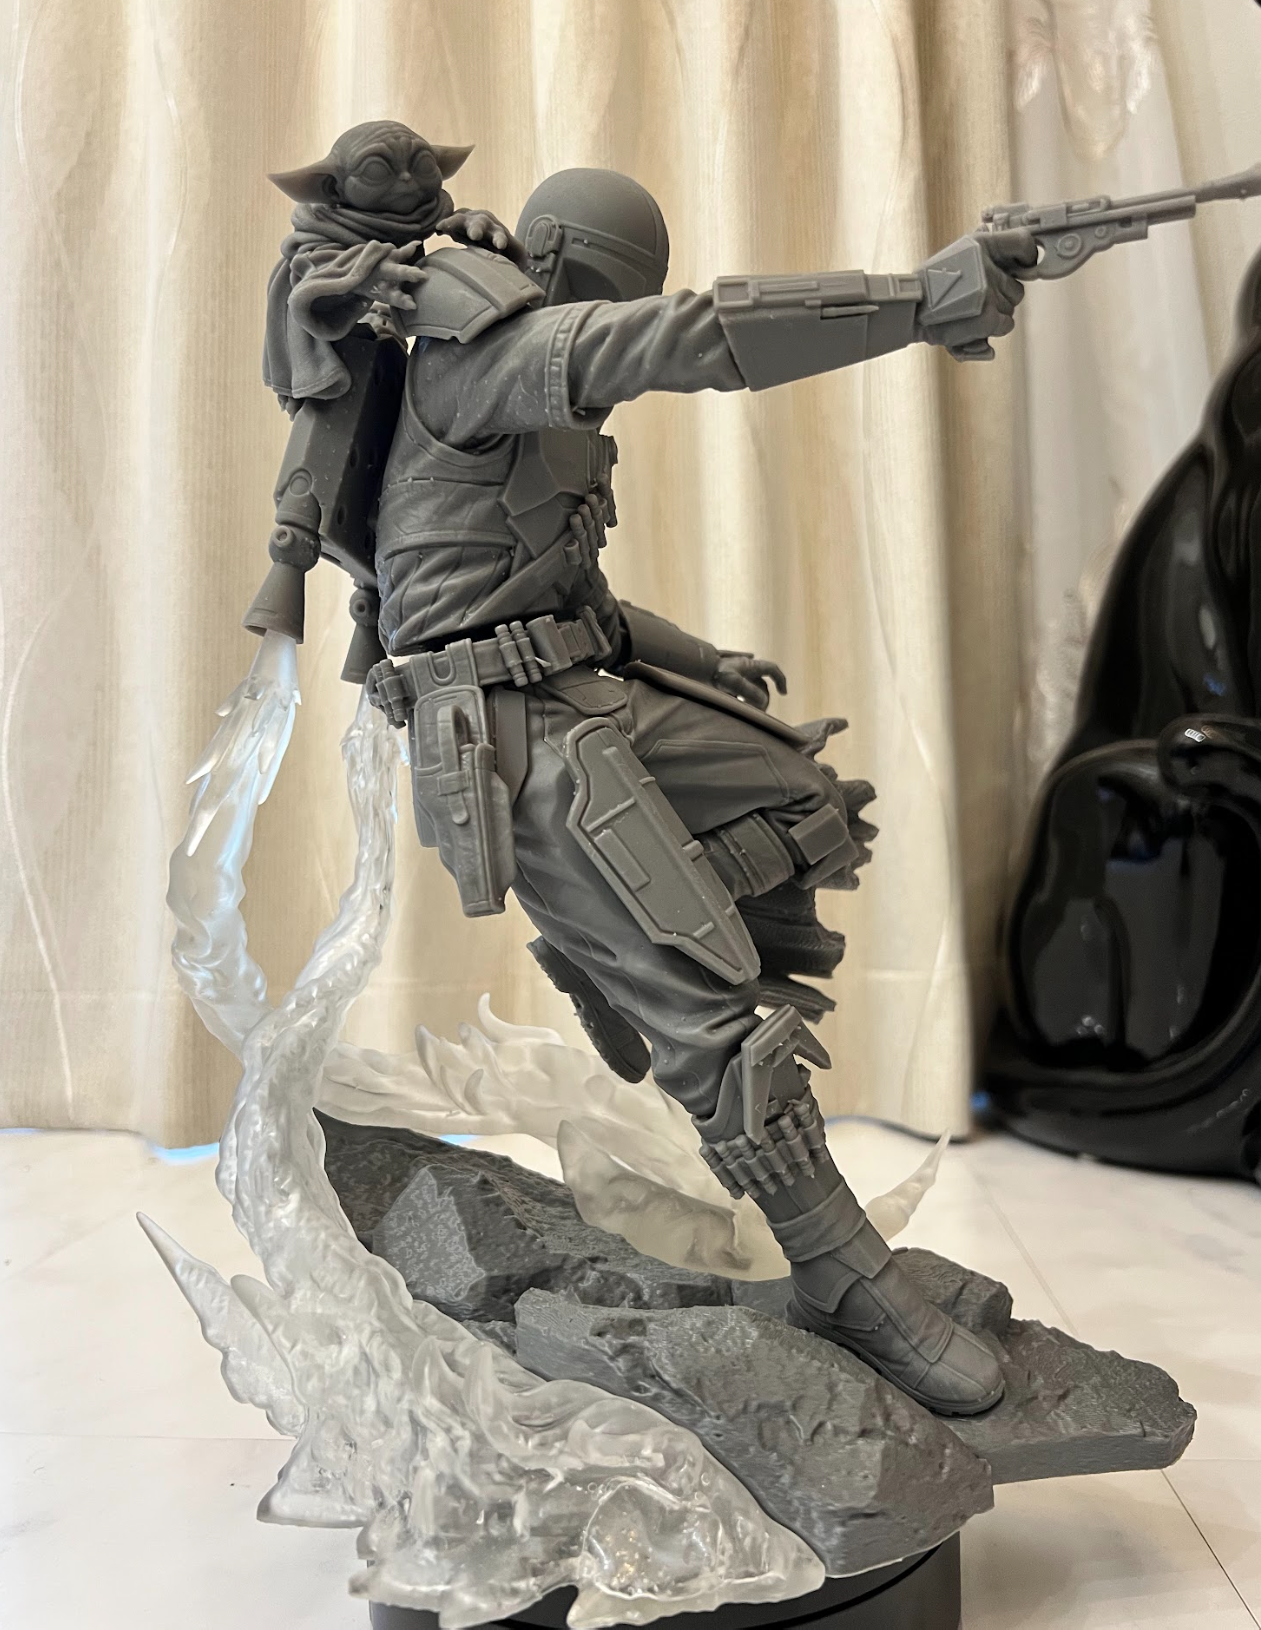
A customer wanted a large Mandalorian and Grogu diorama with a specific material treatment: gray resin for the figure and the rest of the scene, and clear resin for the jetpack fire effects. The model was scaled to 1/6, making the two fire-effect pieces substantial prints in their own right.
The challenge was to deliver those contrasting materials while managing weight, appearance, machine availability and production cost.
The problem: “clear” is an expectation as well as a material
People often hear “clear resin” and imagine a glass-like finish. That is not necessarily how a freshly printed part looks. The final appearance depends on the material, the geometry and the post-processing work.
For this project, I had to consider more than whether the fire effects would print successfully. I also had to think about how their construction would affect the transparency the customer expected.
The decision: balance hollowing with appearance
Hollowing can make a significant difference on large figures. It reduces material use and weight, which can help control cost and make a large assembly more manageable.
Clear parts introduce another consideration: the internal cavity and surfaces can change how the finished piece looks. Saving resin is useful, but it should not undermine the intended visual effect.
I hollowed the clear-resin flame pieces with 2 mm walls and provided drainage openings so resin could escape. Support planning was also important for these large pieces.
The wall thickness varied across the assembly. These settings have been confirmed for this build.
| Component | Wall thickness |
| Clear-resin flames | 2 mm |
| Base | 2 mm |
| Boots and upper legs | 2 mm |
| Torso and arms | 1.5 mm |
| Helmet, head and Grogu | Approximately 1 mm |
These describe this particular build, rather than recommended settings for every model.
The workflow: a dedicated clear-resin print run
Gray is my usual production resin. That makes it possible to combine compatible parts from different projects into a print run.
I used the Anycubic M3 Max for the large clear-resin portions and the Elegoo Saturn 4 Ultra for the gray-resin portions.
The clear effects could not simply join those gray-resin jobs. I set aside a machine for the clear-resin portion of this project. That meant allocating printer capacity to two large effect pieces and planning the changeover afterward: removing the clear resin and cleaning the equipment before returning to the normal gray-resin workflow.
Those steps are part of production. The material in the model is only one component of the cost; setup, machine occupancy and cleanup also matter.
Pricing this project
I would charge ¥40,000 today for this project. The customer on this build had purchased from me before, so I gave them a slight returning-customer discount. Their exact payment is not stated here.
The ¥40,000 figure is my current price for this particular project, not its measured production cost or a standard price for every 1/6-scale figure. The clear-resin run, dedicated machine time and material changeover all need to be reflected in the quote.
Finishing the clear effects
For this build, I used a paintbrush to apply clear resin from the vat directly onto the already cured, printed clear parts as a finishing step. This describes the work performed; a complete coating and curing procedure is outside the scope of this case study.
A glass-like appearance takes additional post-processing. Depending on the part and desired finish, that can involve fine-grit sanding over multiple passes and further finishing work. The customer should understand the expected delivered finish before printing begins: choosing clear resin does not mean the print will arrive looking like glass.
Print reliability
There were no print failures on this project. The challenge was planning the two material workflows, supporting the large parts and managing expectations for the clear effects.
The result
The print came out very well, with detailed gray components and translucent fire effects. My production photographs show the assembled, unpainted diorama and the contrast between those materials.
The customer later sent photographs of their painted, completed model. Those images will be added only after their permission is confirmed.
Sculptor credit: Zenith Patreon. The model files are available to purchase from Cults3D — Mandalorian and Grogu.
The detailed source files were an important part of the result. My contribution was the physical production: scaling, print preparation and printing. Good printing decisions matter, and so does the quality and physical practicality of the source files.
What you can learn from it
- Agree on the intended appearance of clear parts before production. Clear resin alone does not promise a glass-like finish.
- Evaluate hollowing for weight, material use and appearance together.
- Include resin changeovers, cleanup and dedicated machine time in your production estimate.
- Assess the files as a physical assembly, not only as a digital sculpture.
- Match the project’s difficulty to your capabilities before committing to a result or a price.
An attractive digital sculpt can be demanding to manufacture without reflecting poorly on the artist. Bringing it into the physical world introduces constraints that need their own production decisions.
A future comparison
I also printed a personal 1/24-scale version of the same diorama while I had clear resin available. Photographs and a scale comparison will follow separately.
Pingback: Planning a Model That Uses Both Gray and Clear Resin - Dan Johnson IV